Welding isn't just about joining metal pieces together for construction purposes. It's actually a creative outlet that combines skill, imagination, and craftsmanship beautifully. Many beginners think welding requires expensive equipment and years of training. However, you can start creating impressive art with basic tools and scrap metal. This guide will walk you through easy welding art projects for beginners. You'll discover simple ideas that help build confidence and develop your skills. 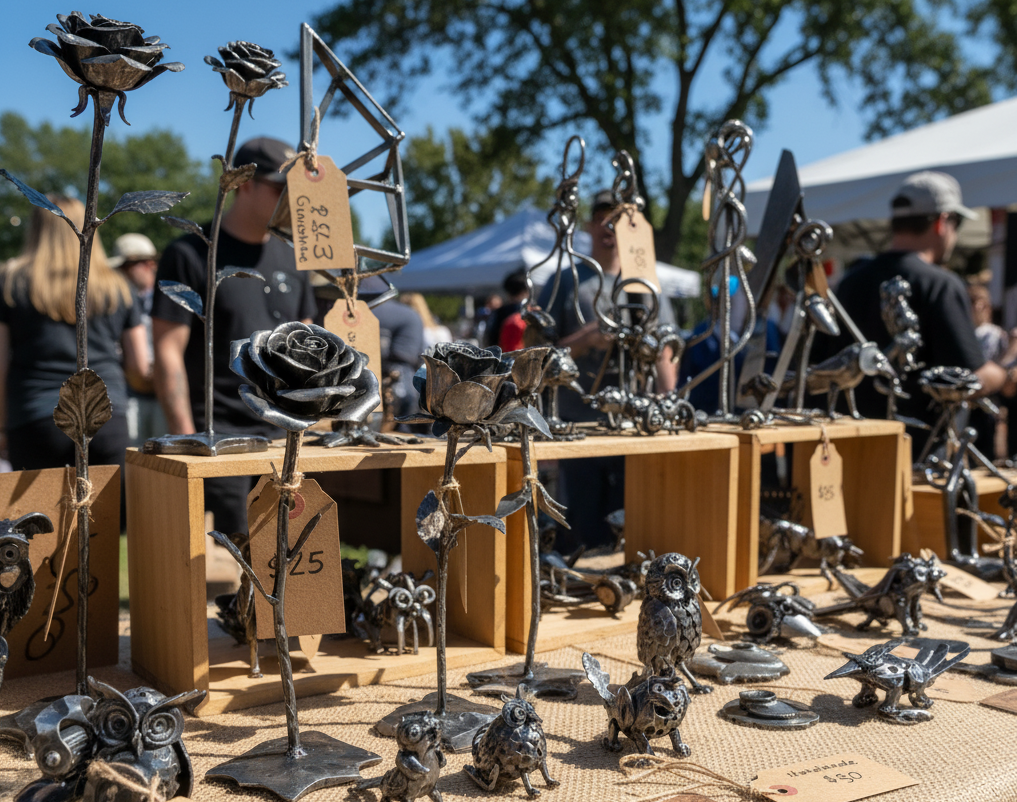
What Is Welding Art and Why Is It Becoming Popular?
Welding art involves using welding techniques to create decorative or functional metal sculptures. Artists use heat to fuse metal pieces, forming everything from garden ornaments to wall hangings. It's believed this craft has gained popularity because it transforms ordinary scrap into something beautiful. Many people think the industrial aesthetic fits perfectly with modern home décor trends.
According to experts, welding art appeals to beginners because it's surprisingly accessible nowadays. You don't need a fancy studio or massive investment to get started. Basic welding equipment has become more affordable and user-friendly in recent years. Plus, scrap metal is often free or very cheap to source locally. This combination makes the hobby budget-friendly for most people who want to try it.
Interestingly, social media has played a huge role in spreading welding art's popularity. Platforms like Instagram and YouTube showcase stunning creations that inspire viewers daily. Many beginners give it their all after seeing these projects online. The satisfaction of building something with your own hands is truly rewarding. Welding art also offers stress relief, which has led to growing interest worldwide.
What Welding Techniques Are Easiest for Beginners?
MIG Welding (Metal Inert Gas)
MIG welding is often recommended as the best starting point for newcomers. This technique uses a continuous wire feed that acts as both electrode and filler material. The process is relatively simple because the machine does most of the work for you. You just need to guide the torch along the metal surface steadily. An inert gas shields the weld from contamination, which helps create clean joints. Many people think MIG welding is forgiving because it works on various metal thicknesses. It's perfect for art projects like sculptures, garden decorations, and metal furniture. The learning curve isn't too steep, so beginners can produce decent results quickly. According to experts, MIG welding offers great control and produces minimal spatter or mess. You can practice on scrap metal until you feel confident with your technique.
Stick Welding (SMAW)
Stick welding has been around for decades and remains popular among beginners today. This method uses a consumable electrode coated with flux to create strong welds. The equipment is typically less expensive than MIG welders, making it budget-friendly. However, stick welding requires a bit more practice to master the hand-eye coordination. You need to maintain a consistent arc length while the electrode burns down. Many beginners appreciate that stick welding works well outdoors, even in windy conditions. It's believed this technique is excellent for thicker metals and rusty materials. For example, you can use it to create sturdy metal yard art or decorative gates. The welds are strong and durable, which is ideal for outdoor projects. Interestingly, stick welding teaches fundamental skills that transfer to other welding methods later.
TIG Welding (Tungsten Inert Gas)
TIG welding produces the cleanest and most precise welds of all welding techniques. This method uses a non-consumable tungsten electrode to create the weld pool. You control the filler material separately with your other hand, requiring good coordination. Research suggests TIG welding has a steeper learning curve than MIG or stick methods. However, it's perfect for detailed art projects that need smooth, beautiful finishes. Many artists use TIG welding for intricate sculptures and decorative metal work. The process works exceptionally well on thin metals like stainless steel and aluminum. You can create delicate pieces without warping or burning through the material. From my point of view, beginners should try simpler techniques first before attempting TIG. But if you're patient and dedicated, TIG welding offers unmatched artistic possibilities.
What Tools and Materials Are Needed for DIY Welding Art?
Welding Machine – Choose between MIG, stick, or TIG based on your budget and project needs. MIG welders are beginner-friendly and versatile for most art projects.
Safety Gear – You'll need a quality auto-darkening welding helmet to protect your eyes. Leather gloves, a welding jacket, and steel-toed boots are absolutely essential for safety.
Metal Materials – Scrap metal works perfectly for practice and budget-conscious projects. Visit junkyards, recycling centers, or ask local fabrication shops for leftover pieces.
Angle Grinder – This tool smooths rough edges and prepares metal surfaces before welding. You can also use it to clean up finished welds nicely.
Clamps and Magnets – These hold metal pieces in position while you work on them. Magnetic squares are especially helpful for keeping joints at perfect right angles.
Wire Brush – Use this to clean metal surfaces and remove rust or paint. Clean metal creates stronger welds and better-looking finished projects overall.
Measuring Tools – A tape measure, square, and marker help ensure accurate cuts and placements. Precise measurements make your art projects look much more professional.
Metal Cutting Tools – A plasma cutter, angle grinder, or hacksaw cuts metal to size. Choose based on your budget and the thickness of metal you're working with.
Workbench – A sturdy metal table provides a safe, stable workspace for your projects. Make sure it's fireproof and positioned in a well-ventilated area.
Fire Extinguisher – Always keep one nearby because welding involves sparks and extreme heat. Safety should never be compromised, even for small hobby projects at home.
10 Most Easy Welding Art Projects Ideas for Beginners
1. Metal Flower Garden Stakes
Metal flowers are among the most popular and forgiving projects for new welders. You can create them using simple circular cuts from sheet metal or steel. The petals don't need to be perfectly symmetrical to look charming and artistic. Many beginners appreciate that mistakes often add character rather than ruining the piece. You'll practice basic tack welds to attach petals to a central rod or stem. This project teaches you how to control heat on thin metal without burning through. According to many welding instructors, flowers help develop your hand control and precision skills. Plus, you can make multiple flowers to practice and improve your technique gradually.
How to Create Your Metal Flowers
Start by cutting circles from thin sheet metal using tin snips or an angle grinder. Cut each circle into a spiral pattern to form the petals naturally. Alternatively, cut individual petal shapes and arrange them around a central point. Use a steel rod or rebar as the stem for your flower. Tack weld the petals to a small metal disc, then attach it to the stem. You can add leaves by cutting leaf shapes from scrap metal sheets. Paint your finished flowers with outdoor spray paint for weather protection and color. These make excellent garden decorations that last for years without much maintenance. Research suggests they're great gifts that friends and family truly appreciate.
2. Simple Metal Sculpture
Abstract sculptures let you explore creativity without following strict design rules or guidelines. You can weld together random pieces of scrap metal to create interesting forms. This project is forgiving because there''s no "right" or "wrong" way to do it. Many artists believe that abstract work helps you understand metal''s properties and behavior. You''ll learn how different thicknesses and shapes interact when joined together. Start by collecting various metal scraps like bolts, washers, gears, and small rods. Lay them out in different arrangements until something feels visually interesting to you. Then simply start tacking pieces together, building upward or outward as you go.
Building and Finishing Your Sculpture
Begin with a solid base made from a heavy metal plate or thick rod. This ensures your sculpture won't tip over once it's finished and displayed. Weld heavier pieces at the bottom and lighter elements toward the top. Work slowly, adding one piece at a time to maintain balance and structural integrity. You can rotate the sculpture as you work to view it from different angles. Interestingly, some beginners prefer working on a lazy susan for easy rotation access. Once complete, clean the welds with a wire brush for a polished look. You might leave it natural for an industrial aesthetic or paint it completely. Display your sculpture indoors or outdoors as a unique conversation piece that showcases your skills. 
3. Horseshoe Art
Horseshoes are thick, easy to handle, and readily available from farm supply stores. They're already curved in an interesting shape that lends itself to various designs. Many beginners find horseshoes forgiving because the metal is thick and won't burn through. You can create animals, hearts, crosses, or decorative wall hangings using just horseshoes. This project teaches you how to position and tack weld pieces at different angles. Old horseshoes often have character marks that add authenticity to your finished piece. According to experts, horseshoe projects boost confidence because they look impressive with minimal effort. Plus, they're relatively inexpensive, so you can practice without worrying about wasting materials.
Creating Your Horseshoe Design
Start with a simple design like a heart made from two horseshoes welded together. Position the horseshoes so their curved ends meet at the bottom point. Tack weld the connection points, then go back and complete the full welds. You can add decorative elements like metal flowers or leaves between the horseshoes. For example, create a horseshoe cowboy boot by stacking and angling multiple shoes. Or make a horseshoe cross by positioning four shoes to form the shape. Clean your finished piece with a wire brush and apply a clear coat. Many people hang these on fence posts, barn doors, or interior walls for rustic décor. It's believed horseshoe art brings good luck, making them popular gifts for new homeowners.
4. Metal Candle Holders
Candle holders combine artistic design with practical function, making them doubly rewarding to create. You'll work with smaller pieces of metal, which is perfect for practicing precision. This project teaches you how to create level surfaces where candles can sit safely. Many beginners appreciate that candle holders don't require complex welding patterns or techniques. You can make simple designs using square tubing, flat bars, or round stock. The key is ensuring the candle holder is stable and won't tip over easily. Research suggests that functional art pieces give beginners a sense of accomplishment and pride. You're not just making decorations; you're creating something useful for everyday life.
Step-by-Step Construction Process
Cut a metal base from flat bar stock, roughly four to six inches square. This provides stability for your candle holder so it won't fall over accidentally. Cut three or four vertical pieces of round or square stock as supports. Weld these vertically to the base, spacing them evenly to create a stable structure. At the top, weld a smaller flat piece or a metal ring to hold the candle. Make sure the top surface is level so the candle sits straight and burns evenly. You can add decorative spirals, leaves, or geometric shapes around the vertical supports. Paint or leave natural depending on your home décor style and personal preferences. These make excellent handmade gifts for holidays, weddings, or housewarmings that people actually use.
5. Railroad Spike Knife
Railroad spike knives have become incredibly popular among beginner metalworkers and welding enthusiasts. This project combines basic forging, grinding, and welding skills all in one piece. You'll learn how to shape metal, create a sharp edge, and attach a handle. Many people think railroad spikes are perfect because they're made from high-carbon steel. This means they can be hardened and sharpened to hold an edge reasonably well. The project teaches patience because it involves multiple steps beyond just welding alone. According to many instructors, this builds confidence in handling metal in different states. Plus, the finished knife is both decorative and functional for light cutting tasks.
Creating Your Railroad Spike Knife
Start by heating the railroad spike in a forge or with a torch. Hammer the spike flat to form the blade shape, tapering toward the edge. Use an angle grinder to refine the blade shape and create a sharp edge. You can leave the railroad spike head as part of the handle for character. Alternatively, cut it off and weld on a custom handle made from flat bar. Add wooden scales to the handle using epoxy and pins for comfortable grip. Heat-treat the blade by heating it red-hot, then quenching it in oil quickly. Temper the blade in an oven at around 400 degrees to reduce brittleness. Polish and sharpen your finished knife, then display it or give it as a gift.
6. Metal Yard Art Animals
Animal sculptures bring personality and whimsy to any garden or outdoor space beautifully. Beginners often start with simpler animals like owls, dogs, or chickens. These designs use basic geometric shapes that are easier to cut and weld together. You don't need perfect proportions; folk art style animals look charming even when simplified. Many people suggest starting with flat, two-dimensional designs before attempting three-dimensional sculptures. This lets you focus on welding technique without worrying about complex structural issues. For example, a flat owl made from circular saw blades is very popular. Research suggests animal projects help beginners think creatively about using scrap materials innovatively.
Bringing Your Metal Animal to Life
Sketch your animal design on paper first to plan out the pieces needed. Cut the body from a large piece of sheet metal or an old barrel. Use smaller pieces for legs, wings, tail, and head depending on your chosen animal. Position the pieces on your workbench and arrange them until you're satisfied visually. Tack weld everything in place, then check from multiple angles before completing welds. Add details like eyes using washers, bolts, or ball bearings welded in place. You can use horseshoes for owl eyes or chicken feet for added character. Paint your animal with outdoor-rated paint to protect it from rust and weather. Many beginners place their creations near flower beds, fence lines, or garden pathways proudly.
7. Fire Pit or Burn Barrel
A fire pit combines welding practice with creating something incredibly useful for your backyard. You'll work with larger pieces of metal, which is more forgiving for beginners. This project teaches you how to make continuous welds along longer seams successfully. Many homeowners want custom fire pits, so this skill has practical value beyond art. You can use old propane tanks, barrels, or sheets of thick steel plate. The project doesn't require perfect aesthetics since it'll be exposed to fire regularly. According to experts, fire pits help you understand heat control and metal thickness considerations. Plus, you'll get to enjoy your creation during outdoor gatherings with friends regularly.
Building Your Custom Fire Pit
If using a propane tank or barrel, ensure it's completely empty and safe. Cut the top off carefully with an angle grinder or plasma cutter. You can cut decorative patterns in the sides for airflow and visual interest. Many people cut star patterns, trees, or geometric designs that glow when burning. Weld legs onto the bottom using angle iron or square tubing pieces. Make sure the legs are sturdy enough to support the weight when full. You can add a grill grate on top by welding on support brackets. Create handles on the sides using rebar or round stock for easy moving. Clean all welds and apply high-temperature paint to prevent rust from forming quickly. Without a doubt, you'll enjoy countless evenings around your handmade fire pit.
8. Metal Table or Shelf
Furniture projects teach you how to create strong, load-bearing welds that must hold weight. A simple side table or wall shelf is perfect for developing these skills. You'll learn about structural integrity and how to distribute weight properly across joints. Many beginners find furniture rewarding because it's functional and can be used daily. This project involves measuring carefully and cutting pieces to precise lengths for proper fit. Square tubing works excellently for table legs because it's strong and easy to weld. Research suggests furniture projects help you understand the importance of level surfaces and square corners. You're creating something that must be both attractive and structurally sound simultaneously.
Constructing Your Metal Table
Design a simple table with four legs and a rectangular or square top. Cut four equal lengths of square tubing for the legs of your table. Cut four more pieces for the top frame that will support the tabletop. Weld the top frame together first, checking carefully that all corners are square. Weld the legs to each corner of the frame, using a square to keep them perfectly vertical. You can add lower cross-braces between legs for extra stability if desired. For the top, weld on a piece of expanded metal, mesh, or sheet steel. Alternatively, create a frame and drop in a piece of wood or glass. Grind all welds smoothly and paint the frame in your preferred color choice. Clearly, this table will serve you well for years while showcasing your growing skills.
9. Bottle Opener
Small projects like bottle openers teach precision and attention to detail effectively. You'll work with smaller pieces of metal, which requires more controlled welding technique. This project uses minimal materials, so you can make several without significant expense. Many beginners appreciate that bottle openers make excellent gifts that people genuinely use. You can personalize each one with different designs, shapes, or decorative elements added. The functional aspect means you'll get immediate feedback on your welding quality and strength. According to many welders, small projects are perfect for practicing new techniques between larger works. Plus, they're quick to complete, which provides a motivating sense of accomplishment frequently.
Crafting Your Custom Bottle Opener
Cut a piece of flat bar stock about six to eight inches long. This forms the handle and base for your bottle opener design. Weld a large washer or a piece of angle iron at one end. This creates the catching edge that pops off bottle caps when used. You can bend the flat bar slightly using a vice for ergonomic grip. Add decorative elements like metal shapes, initials, or designs along the handle portion. Many people weld on small horseshoes, gears, or cut-out shapes for personalization. Grind any sharp edges smoothly so the opener is comfortable to hold safely. You might leave it natural steel or paint it with your favorite color. It's believed that handmade bottle openers become treasured keepsakes that spark conversations at gatherings.
10. Wind Chimes or Garden Bells
Wind chimes combine visual appeal with pleasant sounds, making them unique welding projects. You'll learn how different metals produce different tones when struck together. This project teaches you to work with various lengths and thicknesses of metal. Many beginners enjoy wind chimes because they add movement and sound to gardens. You can use old pipes, rods, horseshoes, or utensils as the chiming elements. The welding involved is primarily attaching hanging points and creating the support structure. Research suggests that wind chimes help develop your spatial awareness and balance skills. Plus, they're customizable to match any garden aesthetic or personal style preference easily.
Assembling Your Wind Chime
Cut a metal ring or circle from flat bar stock as the top support. This is where you'll hang all the chiming elements from below it. Cut several pieces of pipe, rod, or flat bar in different lengths. Different lengths produce different notes when they strike each other or a clapper. Drill holes through the top support ring for hanging each chiming element individually. Use wire, chain, or thin cable to hang each piece at varying heights. Create a clapper in the center using a washer, ball bearing, or small piece. This moves with wind and strikes the hanging elements to create sound. You can add decorative elements at the top like metal flowers or sun shapes. Hang your finished wind chime where it'll catch breezes and bring music naturally.
How Much Do Welding Art Projects Cost to Start?
Starting welding art as a hobby requires an initial investment between $300 and $800. A beginner-friendly MIG or stick welder falls within this price range comfortably. A complete basic setup, including the welding machine and essential accessories, costs around $500. This covers the wire feeder, gas regulator, and fundamental tools you'll need initially. Many beginners find this investment reasonable compared to other creative hobbies today. 
Safety gear adds another $75 to $200 to your startup costs overall. You'll need a quality auto-darkening helmet, leather gloves, and a protective jacket. These items are non-negotiable because they protect you from sparks and harmful light. Consumable materials like welding wire, rods, and shielding gas cost $30 to $100 per project. However, scrap metal for practice and art projects is often free or very cheap. Many beginners collect metal from junkyards, recycling centers, or construction sites without spending much.
Research suggests total startup costs range from $400 to $1,100 for most beginners. This includes everything needed to start creating welding art projects safely at home. According to experts, buying used equipment can reduce costs by 30 to 50 percent. Harbor Freight and similar retailers offer budget-friendly options that work well for hobbyists. Without a doubt, welding art remains one of the more accessible metalworking hobbies today.
How Much Do Metal Welding Artists Make?
Metal sculptors and welding artists earn an average of $27.35 to $86,275 annually in 2025. Income varies widely based on experience, location, and whether you work full-time or part-time. Professional welders average $22.26 per hour, with top earners making $31.25 hourly. Many welding artists supplement their income by selling pieces at art fairs and online. Custom commissions for yard art, furniture, and decorative pieces provide additional revenue streams.
The median annual wage for craft and fine artists was $56,260 in May 2024. Successful welding artists who establish strong reputations can earn significantly more than averages. It's believed that artists who market themselves effectively online earn 40 percent more. Many welding artists start part-time while building their client base and portfolio gradually. From my point of view, combining artistic talent with practical welding skills creates excellent income opportunities.
Final Thoughts
Welding art combines creativity with practical skills that last a lifetime for anyone. Starting your journey might feel intimidating, but every expert was once a beginner. These easy projects help you build confidence while creating beautiful, functional pieces gradually. Remember, mistakes are part of learning and often lead to unexpected artistic discoveries.
Don't let fear hold you back from exploring this rewarding and fulfilling hobby. Start with simple projects, practice regularly, and watch your skills grow month by month. The welding community is welcoming and always ready to help newcomers learn properly. Pick up that torch and start creating something amazing today—you'll be surprised at what you can accomplish with dedication and practice.